Thank you for contacting XAPiT Support. XAPiT functions very similar to Facebook. A “Page” can be set up for a high-profile person, business, or ministry. A “Group” would be best for a social group (like a group of people sharing recipes, classic cars, topical discussions, and more).
You would set up the "Page" or "Group" as a sub-account under your personal profile. A “Page” or “Group” cannot be set up as a standalone account. You would act as the primary admin of the page, and you can also appoint others that you trust as an “admin” to help you manage or moderate the page or group.
IMPORTANT INFO – You must first have a personal account on XAPiT. All business/ministry “Pages” or “Groups” must be set up under a personal account. All Business or Ministry Page or Group that is set up as a standalone account will be fully deleted and all content (photos, videos, friends, posts, etc.) in the account will be lost.
First, login to your account. If you are setting up a business or ministry "PAGE", select the link in the blue bar at the top of the XAPiT site marked "PAGES", then "Create New Page" and follow the instructions from there.
If you want to set up a "GROUP", select the link in the blue bar marked "GROUPS", then "Create New Group", and follow the instructions.
We recommend checking out (or even joining) other Pages or Groups so you can see how others have set them up to give you some ideas.
Why can’t I send or accept a friend request on XAPiT?
We only recommend adding people you know personally as friends on XAPiT. But you may not be able to add someone as a friend if:
You’re already friends on XAPiT.
You have already sent them a friend request.
You or the person you want to add have reached the friend limit.
You won't be able to accept a friend request if you have already reached the limit of 6,000 friends. For instance, if you still have friend requests that are waiting to be accepted you won’t to be to confirm them as a friend until you were able to drop under 6,000 friends. At that point, you’d then be able to act on it.
Here are the instructions on how to post a blog on XAPiT:
Done!
To change the email address for your XAPiT account, login to your account with your original email address and password, then go to SETTINGS/GENERAL (The “Settings” icon looks like a gear). Change the email address in the box provided, then click the “Save Changes” button. You will then need to logout and then login again using the NEW email address and your original password.
To reset your password if you have forgotten it, here’s how:
How to View Your Friends List on Desktop
Navigate to your Personal Page by clicking on it from the main navigation running across the top of the page. Additionally, you can also get to your Personal Page by clicking on your profile photo in the top left-hand area of the page.
Once you are at your Personal Page, you need only click the Friends Tab button that is displayed below your cover photo and is also to the right of your profile photo.
Once you have clicked on that tab and it is active, all your friends will be displayed below! You should be able to click on any of the names of your friends to go and view their profile.
How to view your friends list on the Android App
Navigate to your Apps Menu by clicking the three horizontal bars in the upper left-hand corner, once that menu has been pulled up click the Menu item for Friends.
You will be directed to a page where it will list all the friends that you have made on the site. You may click on any one of those profile listings to be directed to their profile pages.
How to view your friends list on the iOS App
Navigate to your Personal Page by clicking the bottom three horizontal bars. Once that menu is open, click on your profile photo in order to navigate fully to your personal page.
Once you are at your Personal Page, click the Friends button that is displayed under your cover photo, which is also to the right of your profile photo.
Once that has been selected you will be able to view all your friends which you have made on the site. By clicking on any one of them, you will also be able to navigate to their profile pages.
A quick selfie will do the trick, or a picture of your pet, or just any photo. You just need to upload a photo of some kind. If you are not willing to add a photo of some kind, we regret to inform you that you won’t be able to open a XAPiT account.
Here are the full instructions on how to set up a XAPiT account, including how to add a photo: https://xapit.com/faq/view/10/1/3/0/how-to-sign-up-for-a-xapi-t-account-in-a-web-browser. We hope to see you on XAPiT soon!
To edit your profile, go to your profile page. Then, click the “Update Info” link just under your name and just to the right of your round photo. Scroll down to the option you wish to update and make the change by opening the GLOBE SYMBOL above the field you wish to update. Then select the group of people that you want to see that field information. If you wish to update more than one item, repeat this process for each item listed.
When finished updating, scroll all the way to the bottom and click the blue “Save” button. You should now have the correct information showing when you return to your profile page. If not, refresh your internet browser and then see if the info is correct.
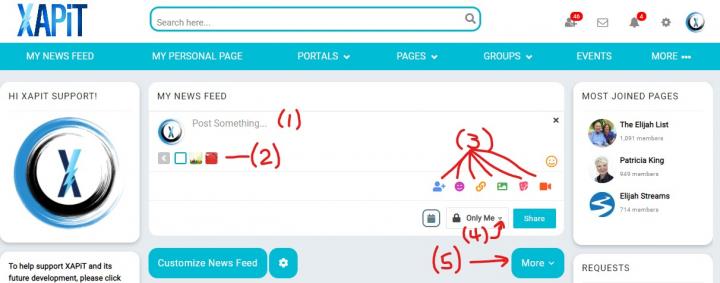
To post something on XAPiT, here are the step-by-step instructions (see the image below for visual reference):
Step 1. Enter the text in the space provided where it says, “Post Something”.
Step 2. Select a colored background, if desired. If not, skip this step.
Step 3. Select one of the 6 icons shown if you wish to customize the post. The 6 icons, from left to right, are: “Tag Friends”, “Emoticons”, “Add a Link” (like a YouTube video or news article), “Add a Photo”, “Post a Sticker”, and “Add a Video”. If you do not wish to add one of these, skip this step.
Step 4. Decide who you want to see your post. Choices are “Everyone”, “Friends and Networks”, “Friends Only”, “Only Me”, and “Custom” (you get to select individual members who can see the post)
Step 5. When you are satisfied that your post is the way you want it, click the “Share” button.
Your post is now visible to the people you chose in Step #4. Enjoy!
Here is the proper way to post a photo on your profile page in 5 steps (see image below for visual reference):
Enjoy!
The XAPiT Team
To delete a photo on your profile page, open the photo you want to delete, then scroll down to the bottom, far left corner and click the link that says, “Options”, then select “Delete” and confirm. Repeat for each photo you wish to delete.
When signing up for XAPiT, an AUTOMATED verification email is sent to the email address you used to sign up for XAPiT. You MUST click the link in that email to verify your email address and complete your account setup.
If you’ve lost that email or for whatever reason that link does not work when clicked on, please email XAPiT Support at support@xapit.com and we will make the necessary steps with you to get your account verified.
After verifying your account, you will be able to login and use the site and/or mobile apps.
It is not possible to invite your friends on Facebook (or any other social media program) DIRECTLY from XAPiT. However, there is a way to send invitations to people you know that are not already on XAPiT… here is how:
* Login to XAPiT and click the "MORE ..." link at the right side of the teal bar near the top of the email.
* Select “Invite”.
* On the page that appears, you can invite up to (10) people by entering their email addresses in the box using the instruction at the top of the page. If you wish to invite more than (10) people, you will need to repeat this process with up to (10) email addresses each time you do it. When you have entered the email addresses and entered the custom message you want to send, make sure you check the box under the Custom Message box, then finally, click the blue “Send Invites” button.
Have fun!
The XAPiT Support Team
To share a post from someone’s else’s profile to your own, you will first need to make sure your settings have this feature activated. Here’s how…
Go to the SETTINGS page (looks like a “gear” symbol at the top right corner of the XAPiT page). Click “Privacy”. Scroll to the section marked “Recent Activity Privacy”, then find the option marked “Shared” and make sure there is a check in the box to the left of “Shared”. Finally, scroll down to the bottom of the page and click the blue “Save Changes” button. Sharing the posts of other members to your profile should now work perfectly!
Navigate to the groups page by clicking Groups in the navigation bar.
Next, click to view your own groups by clicking on the link text for My Groups.
Once, you have successfully navigated to and chosen your group from which to approve new member requests to, click to go to the Members tab, and then click on the link text for See Waiting
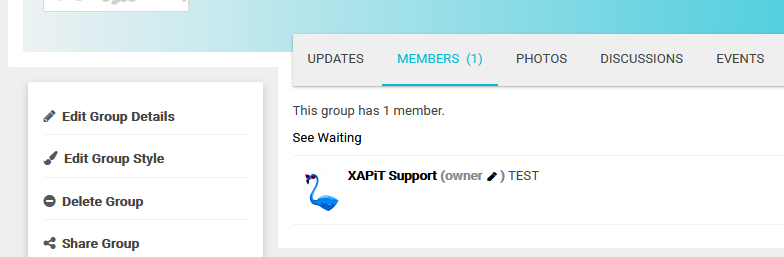
From there you will be able to view anyone who has requested member to join your group.
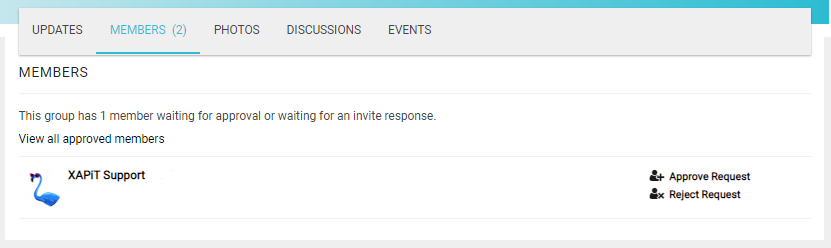
To approve or reject any member who has requested to join, simply click to approve or reject their request that will display to the right of their profile and they will be granted membership to your group.
How to Delete Your Account
Navigate to your Personal Page.
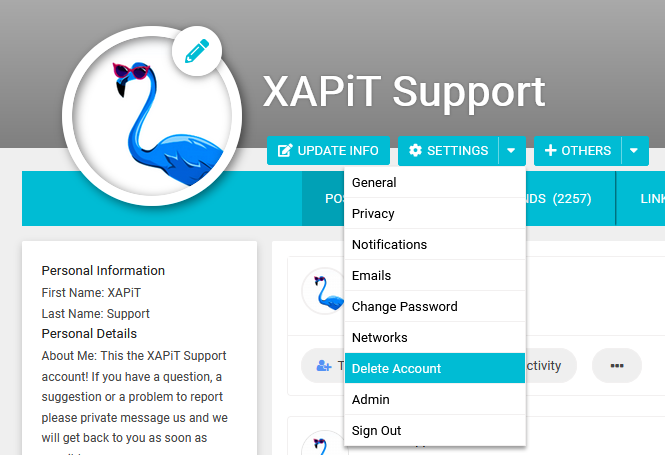
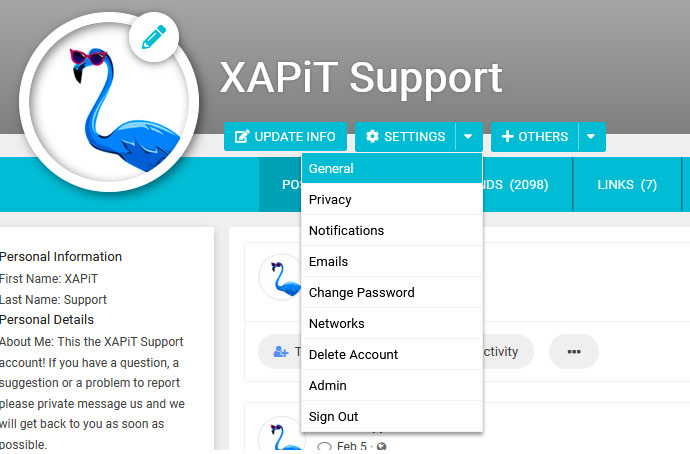
Select the Settings option and select Delete Account from the menu that displays.
Select the button that states Yes, Delete My Account to confirm deletion of your account.
Your account will be immediately deleted and you will be logged out after the account deletion is complete. ALL posts and comments you made on the site will be deleted as well.
If for whatever reason you are unable to delete your account, please email XAPiT Support at support@xapit.com and we will be happy to assist you.
If you would like to make a change to your name, email address or username, please follow the instructions shown below.
Changing Your Name:
Navigate to your Personal Page.
Select the blue Update Info button that’s to the right of your profile photo.
You will be directed to an area which has text input areas for your first name, last name, and other personal information that you can choose if you like.
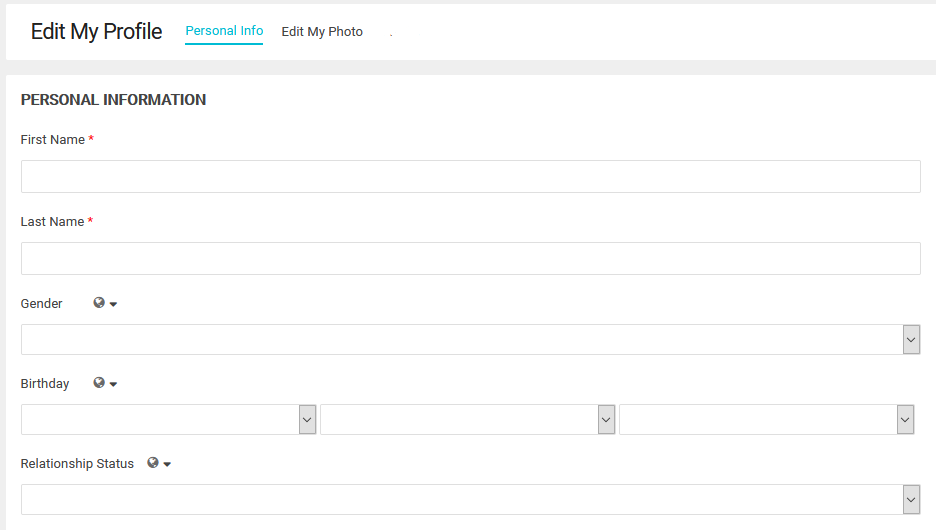
After editing the text input for your first name and/or last name, scroll to the bottom of the page and click the Save button.
Changing Your Email Address and Username/ Profile Address:
Navigate to your Personal Page.
Select and expand the Settings located to the right of your profile image, then click General.
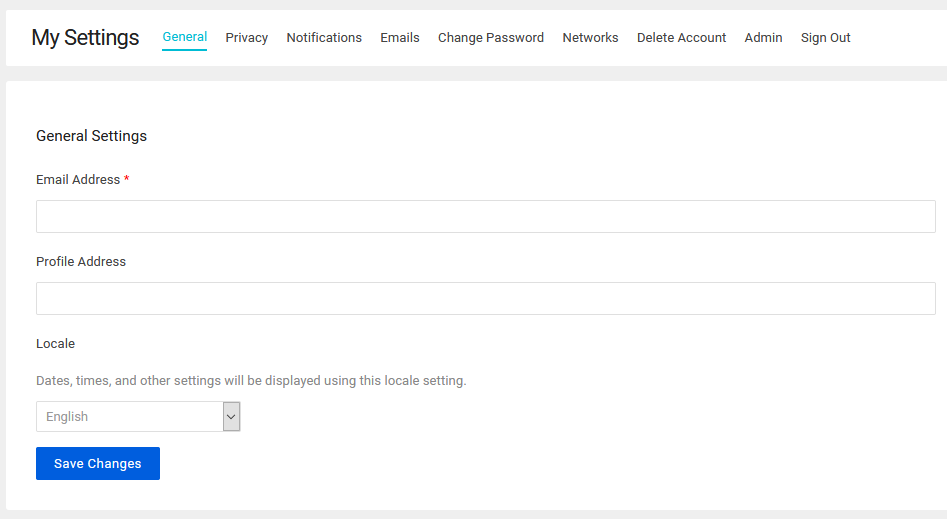
You will be directed to a page where you will be able to change your Email Address and your Profile Address/Username.
After making those changes, click the save button on the bottom of the page and your changes will take effect immediately.